Tuesday, February 2, 2010

A lotta fun going on here!!


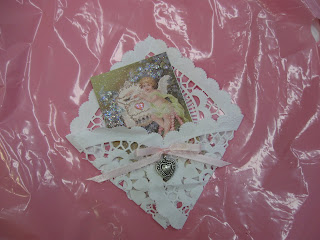
I posted this little Valentine in envelope last week.
Many are having a hard time finding the square doilies.

So I did one out of a heart doily.
I love it even more!


fold in one side

then the other to match...


fold up the bottom if you want....


or just leave it at a point.
Add some trinkets and spray with glitter mist.
Sweet and easy!!

I'm working on more of these...

and these.....
(this print is from Renae at Little Raggedy Blessings.
She shares really wonderful work with us.)
SOLD


and these......
tutorial for "vintage" baby shoes here

and these.
tutorial for tea bag roses Here.
And wait till you see my newest nest creation.
coming soon!!


Penny Pinching

Look at these great papers.
Our garbage bill came in a different envelope this month.
Love that brown!
And since we pay by phone, we can keep both envelopes they sent.

And the other paper?
It is the wrapper off a loaf of deli bread.
It has a wheat print on one side,
and plain brown on the other.
Great isn't it?
And all free!!!


Outdoor White.
I have walked by this address post for 38 years,
but today saw something different.
Do you see it?


Sewing accessories.
Don't ya' just love that little thread guy?
His 'pants' unsnap and needles go there.


Some little red vignettes for you.


Vintage scales and egg basket.


And a little LOVE made from game pieces.=0))

I'm joining in on these special events this week.

Many thanks to all our wonderful hostesses!!

Fourteen Days of Love


Free Signature Generator

DON'T FORGET MY GIVEAWAY COMING SOON!!
I'm on post 697 and watching for those last few followers.!!

Free Signature Generator

Inspiring One Another and Tuesday Specials

I just love how blog land has made the world so small.
We have the opportunity to share and learn with people all over the world.
It is so rewarding for me to know some little thing I have learned or shared is an inspiration to someone else.

This new blog friend was inspired by one of my pieces, and is doing some new, lovely things from that idea.

Her name is Roseny Crisp, and here is some of her work, and a translation from her post.

OK try as i may i could not get her photos to load.
PLEASE take a minute and go see her lovely work.

Go Here to visit Roseny's Blog.

Now for our Tuesday Specials......


This old school desk will get it's second time
around being the display piece on my front porch area.


Here are 3 or more doorknobs...

and 3 or more windows

Here is something I made awhile back.
All you need is a candlestick, doily, stuffing,
and a piece of fabric to line the doily.
opt. buttons, ribbon trim for top.
This candle stick had a hole down the middle,
so I put a few buttons in for a little surprise.
Then I took the liner for the doily,
(always make sure the pins will insert easily into it)
cut about a 6" circle, stitched around the edges,
drew it in a bit and stuffed it.
Pull the thread tightly around to enclose the stuffing.
Glue this onto the top of he candlestick.
Drape doily over the top and glue down.
Now trim it up with whatever you would like.


I'm joining these special bloggers today.
Please swing by and check them out.
Lot of cool stuff going on!

Jackson 005


Thank you all for coming by.

blessings

barbara jean


Free Signature Generator

AND THE WINNER OF FJI GIVEAWAY IS.......


The winner of this sweet little treasure
(made by yours truly)

is Brenda
of


Ladybug Dreams

Congratulations Brenda!!

And Many thanks to Donna at FJI


for such a great party!!!
She always has something special going on,
so best keep an eye on her!
~~~~~~~~~~~~~~~~~~~~~~~~~~

Don't forget, My own giveaway will be here soon.
Getting REALLY close to 700 posts,
and we are aiming for 320 followers before then.


Free Signature Generator

Free Signature Generator

Monday, February 1, 2010

Three or More Second Time Arounds


Three or more old clocks...
and a funny story.
I am taking inventory at the shop,
so every item needs to be counted and numbered.
While tagging these clocks i was seeing which ones worked, and which did not.
Got done tagging them and went off to another room.
Soon I heard this strange noise.
What on earth is that?
Followed the sound, and found
one of the clock alarms going off like crazy!
Guess it worked!! =))


Three or more second time around tea bags,
made into roses.
Tutorial HERE

Vintage Baby Shoe Tutorial HERE

And I showed you this piece a couple of days ago.

Look at it now.

Can you see the difference?


It had an accident, but I love it!
After I finish my projects,
I always give them a coat of Matt spray.
This makes the color a little more vivid, and protects it a bit.
I do this spraying on the edge of the covered patio.
Only if you forget it over night, and it rains much, it gets wet.
And it did!
And for some reason the old music paper turned the loveliest green.
It matched the bird and eggs perfectly!
Now I think this will really be a one of a kind piece, cause I'm not sure I
want to risk 'trying' this method again. =0)

Thanks for coming by
Please be sure to go see all the others who have posted
at these lovely blogs.
And many thanks to our wonderful hostesses.

Blessings on your Tuesday.


Three or More Tuesday


ASPTL

Photobucket

Oh I almost forgot!
A few days ago I posted that when I reached 300 followers
and 700 posts I would have a giveaway here!
Well, I've reached the 300 followers, but have a few more posts to go.
So , lets see if we can get another 15 followers before I hit my 700th post,
and I will have two prizes for the drawing!!
On your mark, get set, go!!!


Free Signature Generator

Free Signature Generator

"Vintage" Ballet Slippers and a Giveaway at Diane's


My friend Lisa, at Tarnished and Tattered used my
Vintage Baby Shoe Tutorial to do these ballet slippers!
Are they not tooo sweet and adorable!!
And, she has an ETSY shop where she is selling them!
(why did I not think of that?) =0)

Great job Lisa, and thanks for sharing!


And while I was at Lisa's, I found out one of my Fave artists is having a giveaway!
It's Diane, at Diane Knott's Musings!
I so cannot believe I am telling you, cause I love her creations!!
Well, I guess probably most of blog land knows by now anyway.
So, go on over and sign yourself up. (But please let me win.) =))

Have a wonderful Monday everyone!!


Free Signature Generator

TEA BAG ROSE TUTORIAL


Tea Bag Roses

supplies:
tea bag (already used)
scissors
glue (I used glue gun)
nimble fingers =0)


Just a little note on my tutorial:
I have started using glue sticks and toothpick to glue my roses as I go.
No burnt fingers!!!!
And you get to use that last little bit of glue you
can never get out of the bottom of the stick. =)


already used tea bag
black tea bags work best
(Herbal does not have much color)
Black tea= brown rose
raspberry tea= pink rose

open tea bag up
(you can either carefully open by little seam,
or just cut open)
dump out grounds.


After paper is dry, cut into 3 or 4 strips lengthwise.
(I usually do 4)

On right side of strip, fold corner down as shown.
Begin rolling towards you, tightly, to end of folded piece.
This will be the center of your rose.


Continue to pinch together at bottom,
gather, and roll with your fingers.
The 'gathering' keeps the rose fuller.
As you go be sure the center of rose stays lower
than the outside 'petals' you are making.
Think of how real roses are.

As you can see in above photo,
I am pinching bottom with my middle and ring fingers.
I am also using my right hand to help roll, but had to take pic with it. =))
Sometimes I kind of scrunch top edge to add interesting folds to top of rose.
You will get better at this as you practice.
(My first ones were horrible!
You might call them zero personality roses.) =0)


At end, fold corner down towards outside, and hot glue.
(careful! The glue goes right through the paper)
Then twist bottom of rose as tightly as you can.
(see photo below.)

I then just put my roses aside till ready to use.

To glue to project:


Hold rose gently by pretty part, and snip
off the pointy end that is gathered tight.


(See the little end laying there?
You can actually fluff that up and make the teeniest rose ever!!)


Put hot glue all over this cut end and glue it to your project.
(You can also glue bottoms of a bunch of roses and put aside.)
I've just always done it all in one step.
After it is glued on, just kind of gently
fluff to shape you want.

Adding leaves:
Occasionally, when I have a little spot that needs filling, I will make leaves.
Just double a piece of your tea bag strip, and cut out a leaf shape,
cutting one end straight across, and the other end pointed.
gather the flat end a bit, and glue where desired.
(again, be careful if you are using hot glue,
it gets hot right through the paper.)

Sample below is with leaves.


Hope you have enjoyed this tutorial.
REMEMBER!!!

It is always the first couple that take more time, and patience.
So keep trying!!

If you do up some roses,
I would love to show off your pieces to my blogging friends.

Blessings
Barbara Jean

NOTE added 7/15/10

I would now recommend cutting the tea bag in thirds or
half till you get the hang of it.
It is easier to hold on to.
Then you can go to the tiny roses later.